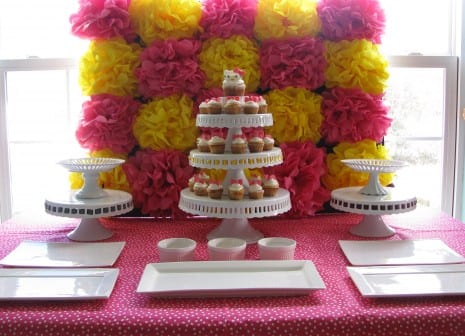
I saw this pom pom backdrop Sarah Y of Sheek Shindigs made for her Hello Kitty Inspired Birthday Party and I loved it!! What a fuffy, colorful way to make a statement! I asked Sarah if she would put together a tutorial and she so graciously said yes. Thank you, Sarah!
Pom pom backdrops are super easy, very inexpensive, and so versatile. These can be used as a backdrop for a dessert table, art on the wall to add to your parties decor, or as a “photo booth” backdrop.
Supplies:
- 1 large piece of foam board or several smaller pieces of foam board, depending on what size you want the backdrop to be
- Tissue paper, in assorted colors of your choice
- Floral wire
- Hot glue gun
- Scissors
If you are using several pieces of foam board, begin by taping your foam board pieces together to create the overall backdrop size you want.
Sarah suggests using a heavy tape, such as duck tape or packaging tape. Simply run tape along the seams of two pieces of foam board (on the backside).
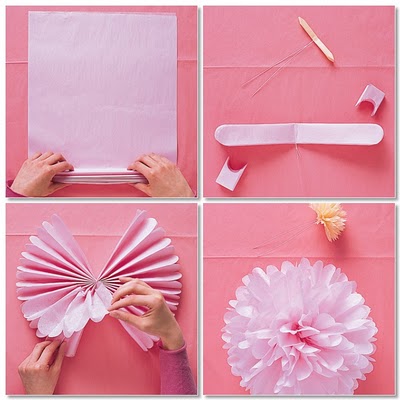
Now you are ready to start making your tissue paper pom poms. Martha Stewart provides an excellent tutorial on how to do this below. (Pictures from Martha Stewart).
Step 1 — Stack eight 20-by-30-inch sheets of tissue. Make 1 1/2-inch-wide accordion folds, creasing with each fold.
Step 2 — Fold an 18-inch piece of floral wire in half, and slip over center of folded tissue; twist. With scissors, trim ends of tissue into rounded or pointy shapes.
Step 3 — Separate layers, pulling away from center one at a time.
Now that your pom poms are made, begin gluing rows of pom poms onto your foam board backdrop using a hot glue gun.
Sarah suggests laying the board flat during this process and applying the glue at the center of the pom pom, where the wire has been wrapped. She chose to alternate colors but your backdrop design is only limited by your imagination. “Have fun!” Sarah says!
Thank you, Sarah, for this quick and easy tutorial!
To learn more about Sarah and read all her party inspirations and ideas, please visit her blog, Sheek Shindigs. Also, take a look at Sarah’s gorgeous parties on our site.
If you make a pom pom backdrop like this, we’d love to see it. Please email your photos to jillian@catchmyparty.com so I can show them off.

