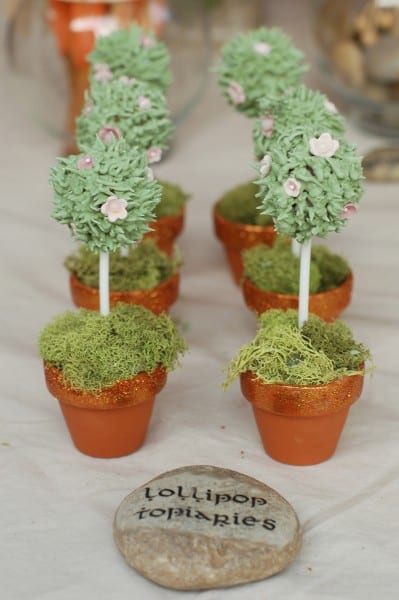
Nicole, who threw the lovely Magical Cornish Fairy Affair for her daughter, created these fabulous lollipop topiaries as part of her dessert table.

I’d never seen anything like them, so I asked Nicole how she made them, and she generously put together this tutorial…
One of my favorite elements of the dessert table I created for my daughter’s Cornish Fairies party were the lollipop topiaries.
I’ve been making a version of these for years for my gingerbread houses, and when I decided to do a full-blown dessert table for a fairy-themed party, miniature sized topiaries made out of sugar seemed like an ideal fit! Cake pops are great, but I see them everywhere. I wanted to come up with something all my own, and this was it.
They’re incredibly simple to make, but have a real wow-factor. You’ll need:
Miniature terracotta flowerpots (mine were 1.5″ tall, bought at Joann’s).
Glue
Glitter
Styrofoam
Dried moss
Lollipop
Green royal icing
grass or leaf icing tip and disposable icing bag.
Glue gun
Disco dust (optional)
Gumpaste flowers or flower-shaped sprinkles (optional)
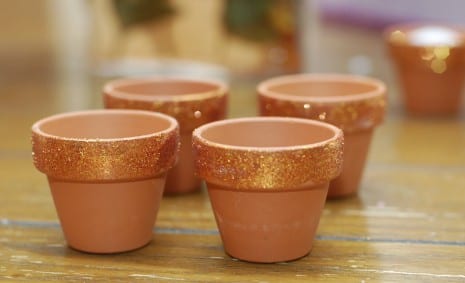
1) Paint glue on the band at the top of the terracotta pot, and sprinkle with glitter. I used Martha Stewart brand. Not only does she have gorgeous colors, but I love how fine the grain of the glitter is. You could easily skip this step, however, if you didn’t want any glitter on your pot. But for our fairy party, *everything* was glittery!

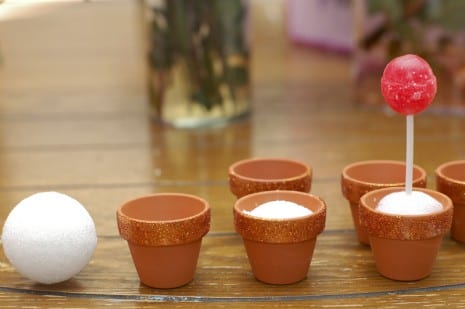
2) Cut a piece of Styrofoam small enough to wedge into the terracotta pot. Push it down in there tight so it won’t pull out. Stick an unwrapped lollipop in the center.

3) Remove the lollipop, then fill the hole where the stem was with a little hot glue. Quickly push the stem back in place and let the glue cool down. This will allow you to be more rough and turn the whole thing upside down without fear when covering the candy with icing. Yeah, learned this step the hard way. 😉
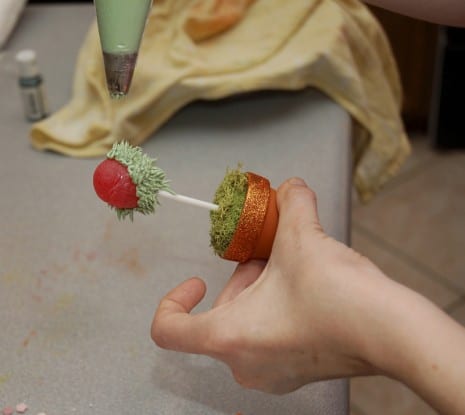
4) Use glue gun to adhere dried moss to the base and cover any visible Styrofoam. I always use a low temperature glue gun, because I always glue myself when I use one. Always. Always. Especially when gluing something porous like moss. I was glad I’d used a low-temp gun several times when making the six lollipop topiaries for the party.
5) Make up a batch of royal icing and color it green. I love using the recipe on the container of meringue powder available from craft and cake decorating stores. So much easier than separating egg whites perfectly and whipping for ten minutes or more! Put in a piping bag with your choice of tip. (I used a grass tip, but a leaf tip also works very well for this purpose. Even a star tip would look great!) Cover the lollipop with royal icing.

6) If you wish, sprinkle with disco dust (a highly sparkly edible glitter available online and through cake decorating stores. NOT available through Wilton. Their edible glitter is NOT the same stuff, and will disappoint). I had some leftover gumpaste flowers, so added those to my topiaries, but they looked great without them, too. (Oh oh oh! Could you imagine half red and half white flowers on these for an Alice in Wonderland dessert table?? Please oh please someone let me throw a party!) You could also use flower shaped quinns (sprinkles) if you wanted the look, but didn’t want to bother making gumpaste flowers.

There you are! Absolutely adorable, miniature, edible topiaries. These were the hit of the dessert table! Honestly, they were pretty darn cute even before I added the icing, and would look spectacular stopping at that step for a Candyland/Sweet Shoppe party.
Thank you, Nicole for the wonderful tutorial! If you make some lollipop topiaries, please email me photos so I can post them.
To learn more about this wonderful party check out this Spotlight Feature, and also check out Nicole’s other amazing parties on our site and her blog Tradewind Tiaras.
(Do you have a DIY project from one of your parties that you’d like to share? Please email me at jillian@catchmyparty.com. I’d love to show it off!)